The New Zealand Nationals: A Recap by an invasive Aussie
Hey folks! My previous posts on this blog have focused on some rather abstract thoughts about the use of theme in the design of Malifaux rules, but I'm going to be writing about something a little bit different today. I also happen to enjoy Malifaux as a competitive experience, so this past weekend I (along with some incredible people from my local meta) took a flight to Auckland, New Zealand to play in the New Zealand Grand Tournament. This is a two day event that is usually held in August each year, and I thoroughly recommend it as an experience. Not only are the games great, the people awesome, and the competition fierce, but New Zealand also happens to be an amazing country to explore. Even if you can only go for a couple of days, Auckland is just a day trip from the site of Hobbiton as featured in a little known movie series called The Lord of the Rings, as well as a couple of cool other little tourist attractions. Last year my brother and I went on a road trip across the North and South Islands after the event and the whole country is absolutely breathtaking. I absolutely recommend the trip.

This game was fast and exceptionally savage. The Viktorias rushed my lines early in the game, downing Yannic on Turn 1, then Benny on Turn 2. Unfortunately for them, Benny had already performed an eight Rat summon on Turn 1 and, in the process of dying Turn 2, dropped another three rats onto the table (well, actually four, but one of them got murdered by a Viktoria). Those rats proceeded to tear the Viktorias apart or drive their Blight high enough for some Bleeding Diseases to kill them, meaning both Viktorias were gone by the end of Turn 2 as well.
Without the Viktorias in my face I had a bit more room to breathe. A Ronin had slipped down my right flank and I had had my Tunnel Rats flee in fear, rushing to my opponent's deployment zone with Secret Passage to start converting the Strategy markers there. Hamelin then diverted to kill the Ronin rather than let her threaten my own strategy markers, while the rest of my crew "tidied up". Big Jake ran around my deployment zone scoring Breakthrough, and Kenshiro forced the Tunnel Rats to spend more of the game running than scoring than I would like, but Nix scored me both Research Mission and Claim Jump in the centre without any problems and I was able to lock in a very healthy 7-4 win in the end.

As an aside, I would come to really hate this particular board. I would play on it again on day two of the event, and as someone who tends towards crews with many auras that loooong set of walls cutting the table in two would prove extremely problematic in both this game and the next.

The only loss so far had been the Winged Plague, hired with the intent of running up the Blight on whichever target I picked as the Wretch's Vendetta target, which it had duly done.

This picture was taken just before I made my big mistake of the game, I think. I felt it would be a good idea to move Nix in behind Bete Noire, pictured here standing in the middle of the gate, so that I would have Benny and Hamelin sitting in my Cruel Disappointment aura again and would be able to protect my markers with Loose Bowels. It even had the bonus benefit of getting Seamus and an Enslaved Spirit inside my Diseased aura. Unfortunately, it also effectively isolated Nix. Seamus pulled him a bit away from the entrance and chipped him down below half health, and I couldn't force any duels around Nix to heal him up the way I'd planned. My Emissary was still lagging behind, having been doing quite a lot of work healing models back from the damage Seamus had been doing, and couldn't support either. I sent Hamelin through the breach but he was in an awkward spot at that stage, engaged by Sybelle and without any rats to help him out, so in the end Nix died and now Hamelin was isolated too. He went down Turn 4, which I had hoped was late enough in the game and costly enough to do that my opponent would lack the actions to stop me from scoring, but in the end it wasn't quite enough.
Of course, there is no escaping a Secret Passage Hannah, but I was spared the worst of it by a handy Black Joker on Hannah's triple positive damage flip. Tara was able to slip away Turn 2 and wasn't ever in serious danger for the rest of the game, in part because my Nothing Beast was able to jump on top of the Tunnel Rats on Turn 2 and kill them to lock Hannah's mobility down for the rest of the game.
For my part, Turn 3 saw the Nothing Beast get another kill as it dropped a Freikorps Librarian and brought both flanks of the table under my control, while the Scion in later turns (now buried) cemented my voting advantage by being able to vote anywhere I had Minions. In the end, with his cheap models almost all dead and lacking the actions to really score, the game ended in a tight 7-6 victory to me.

Game 4
But onto the subject of Malifaux. This was a pretty intense event from a competition perspective. The Kiwis are extremely well represented in the top tables of the Malifaux Vassal community on a regular basis, it's the kind of tournament where you can finish Day 1 with a win-loss record of 1-2 and still get paired against a world class player for your first game of Day 2. The comment I heard floating around during the event was something along the lines of, "You can't submarine in this event, we still have sharks in the deeps." So, knowing all of that, and with a foreknowledge of the pools released well in advance, I had packed a pretty diverse selection of Masters I felt would do well in the environment. I am fortunate as an Outcast player that the majority of my faction tend to be Size 2 models, because even with the room taken up by all of Hamelin's rats I was still able to fit everything I needed for Hamelin1, Tara1, Von Schill1 and 2, Leveticus1 (admittedly I was only able to fit one Abomination), and Parker2.
My brother, a Neverborn player, had all of two Keywords packed in a case the same size...
Now, onto the games!
Game 1
Round 1 and 2 for the event were GG All packets, with Round 1 a very forgiving pool of Turf War on Standard Deployment with schemes like Research Mission, Assassinate, and Claim Jump. It felt like it would be pretty easy to score for most crews without too much effort doing anything but fighting. I had originally planned to play Von Schill on this pool, but I had a player who was just getting into Outcasts specifically request me as their Round One opponent because they knew of my fondness for Hamelin and wanted to see him in action, and I was happy to oblige. He played the Viktorias, and I went for a Hamelin crew that was extremely heavy on the scheme marker production to really show off what Benny could do if you were seriously committed to fuelling him. Six-Armed Six Shooters and Yannic formed the core of my summoning engine, while the Tunnel Rats were my main concession to the fact that at some point I would need to get to and interact with strategy markers around the board.
 |
| Not pictured: six other rats. |
Without the Viktorias in my face I had a bit more room to breathe. A Ronin had slipped down my right flank and I had had my Tunnel Rats flee in fear, rushing to my opponent's deployment zone with Secret Passage to start converting the Strategy markers there. Hamelin then diverted to kill the Ronin rather than let her threaten my own strategy markers, while the rest of my crew "tidied up". Big Jake ran around my deployment zone scoring Breakthrough, and Kenshiro forced the Tunnel Rats to spend more of the game running than scoring than I would like, but Nix scored me both Research Mission and Claim Jump in the centre without any problems and I was able to lock in a very healthy 7-4 win in the end.
 |
| Not a lot of models left when the game came to an end, but boy did we have the markers for Research Mission. |
Game 2
I was paired up this round against the player I had most wanted to dodge all event, an incredible Resurrectionist player who also happened to be the tournament's TO. I feel like Resurrectionists can be a bit of a weak spot for me, we haven't ever had many in my local meta and they haven't usually played the faction all that widely. Seamus, for example, is a Master who distorts the game quite dramatically and is a Master I think have only played against once in all my time playing Malifaux.
Well, count that as twice, because for this round I was playing Hamelin again into Seamus. The game mode was Carve the Path on Wedge Deployment with a lot of schemes that required you to name models, from Hidden Martyrs to Vendetta to Public Demonstration. Named model schemes always make me nervous, they feel like they allow less room to recover than schemes that could be performed by any model being in a particular spot or dropping scheme markers somewhere. You never know when an opponent's Red Joker is going to randomly rob you of two points. So I went with the only scheme in the pool that didn't require me to name a model (Leave Your Mark) and swore a Vendetta between the Obedient Wretch and the Carrion Emissary.
Despite my inexperience against Seamus, I do think I played this quite well for the first two turns. Nix was consistently in the centre of my formation, Ella Mae, my own Emissary, and even Hamelin on one occasion were all able to keep him moving up in the middle of all my important models, and the result was that Seamus's feared gun never really got to do much work. Turns 1 and 2 went by and besides having to spend a Soulstone or two on damage reduction, I hadn't really taken much damage.
The only loss so far had been the Winged Plague, hired with the intent of running up the Blight on whichever target I picked as the Wretch's Vendetta target, which it had duly done.
 |
| It's a tough life, being a sentient blight bomb. |
Unfortunately, the graveyard walls were very effectively keeping me from touching any of the Seamus crew to any real effect. I did manage to snipe out his Nurse, with Sybelle, the Nurse, and the White Rabbit Company running down the left flank. I sent a Fast Rat King down that side, dropped the Nurse to 2 health, took a lot of health off the White Rabbit Company too, and then detonated the Rat King with a Pustulent Tumours to finish the job. Unfortunately I hadn't dedicated anything to polishing off the White Rabbit Company, and it was able to continue its job of pushing a Carve marker down the board unmolested.
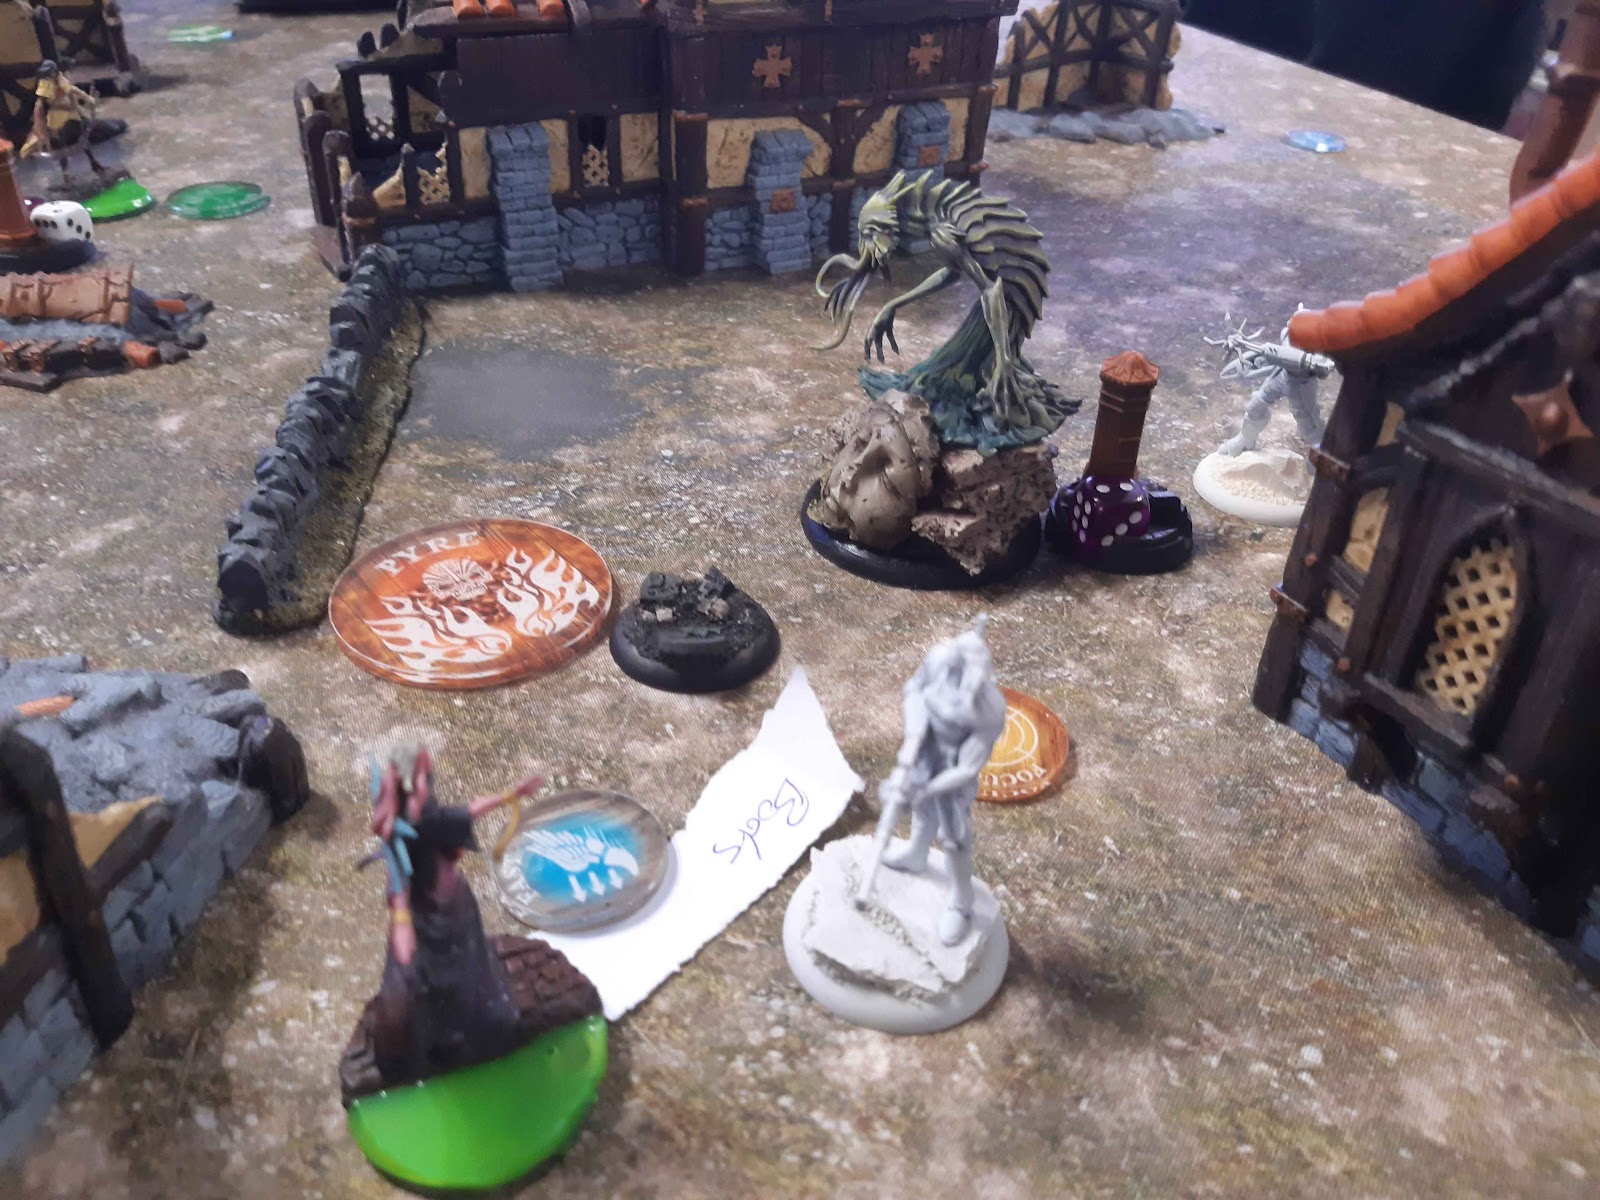
This picture was taken just before I made my big mistake of the game, I think. I felt it would be a good idea to move Nix in behind Bete Noire, pictured here standing in the middle of the gate, so that I would have Benny and Hamelin sitting in my Cruel Disappointment aura again and would be able to protect my markers with Loose Bowels. It even had the bonus benefit of getting Seamus and an Enslaved Spirit inside my Diseased aura. Unfortunately, it also effectively isolated Nix. Seamus pulled him a bit away from the entrance and chipped him down below half health, and I couldn't force any duels around Nix to heal him up the way I'd planned. My Emissary was still lagging behind, having been doing quite a lot of work healing models back from the damage Seamus had been doing, and couldn't support either. I sent Hamelin through the breach but he was in an awkward spot at that stage, engaged by Sybelle and without any rats to help him out, so in the end Nix died and now Hamelin was isolated too. He went down Turn 4, which I had hoped was late enough in the game and costly enough to do that my opponent would lack the actions to stop me from scoring, but in the end it wasn't quite enough.
I lost this game 6-5, having mostly denied my opponent from scoring his schemes all game, but failing to have the models and actions to deny him and score my points on Turn 5.
Game 3
As foreshadowed in my preamble, it turns out losing a game early in the event isn't enough to give you an easy run in New Zealand. My opponent in this round was the champion from last year and the only player I had lost to that year. Worse, he was playing Outcasts and I had hoped to drop Tara in this round. The pool was Stuff the Ballots on Flank Deployment and a mess of schemes that seemed quite tricky to score ranging from Outflank (admittedly, always tempting on Stuff the Ballots) to Sweating Bullets (too dependent on the opponent's positioning for my taste) to Information Overload (again, can be quite hard to do if the opponent is also trying to do it). I had hoped to avoid Outcasts and Guild this round because I really didn't want to have to deal with being attacked while buried, but I had also talked this round through with some of my local players quite extensively and we ultimately decided that Outcasts weren't that big of a problem for Tara. The normal approach is to hire the Nothing Beast, but the Nothing Beast is extremely expensive OOK, hard to support, and I could probably play around it in a number of ways.
My opponent declared Von Schill and, sure enough, hired a Nothing Beast. My normal approach to Tara is to hire all the pre-Ashes non-Minions in the Keyword and keep a 9 stone cache, but I made a concession to my opponent being able to attack into the void and swapped Thirty-Three for Vee so that I would have a bit more healing on offer. For schemes I opted for Deliver a Message (picking the Scion, since he can do it while buried via a friendly Minion and isn't in too much damage from the Nothing Beast overall) and Outflank.
I ended up playing far more aggressively than I had originally intended. As I predicted, I was able to use Aionus's generated pass tokens to play around the threat posed by the Nothing Beast, not summoning or Burying until my opponent was activated out. In the end, I didn't even summon Turn 1, opting to use the cards and Tara's actions to rush down the table and drop the Nothing Beast on top of my opponent's Hodgepodge Effigy and killing it Turn 1. Tara then reburied my Nothing Beast and ran from the threat posed by Hannah and her accompanying Tunnel Rats.
 |
| My opponent asked to borrow my Tunnel Rats for the game, hence the treachery you see here. |
Of course, there is no escaping a Secret Passage Hannah, but I was spared the worst of it by a handy Black Joker on Hannah's triple positive damage flip. Tara was able to slip away Turn 2 and wasn't ever in serious danger for the rest of the game, in part because my Nothing Beast was able to jump on top of the Tunnel Rats on Turn 2 and kill them to lock Hannah's mobility down for the rest of the game.
 |
| Tara is standing next to the corpse(s) of the Tunnel Rats in this image |
Meanwhile, over on the other side of the table, Aionus was caught by Von Schill and beaten to a pulp, eventually dying on Turn 3 for my opponent's In Your Face reveal point. On the plus side, it all took place so close to the Scion that the Scion was able to just walk across the table and Interact to Deliver a Message, no burying required. This continued to keep my opponent's Nothing Beast from being terribly relevant, it spent most of the game flipping badly and occasionally chipping hit points off of summoned Void Hunters.
 |
| A very relevant model |
For my part, Turn 3 saw the Nothing Beast get another kill as it dropped a Freikorps Librarian and brought both flanks of the table under my control, while the Scion in later turns (now buried) cemented my voting advantage by being able to vote anywhere I had Minions. In the end, with his cheap models almost all dead and lacking the actions to really score, the game ended in a tight 7-6 victory to me.
Game 4
Bad news from here on. I dropped my phone at the airport on the way home, and it seems to be pretty thoroughly busted. At time of writing I haven't been able to retrieve my day two photos, so we will have to be content with those I had already uploaded at the end of day one. I will briefly speed through the next two games.
Now, for this round, I was facing Ten Thunders on a Plant Explosives pool absolutely chock full of scheme marker schemes. I opted to play Parker2, but I was seriously hampered in my options by that same bloody graveyard wall from Game 2. My opponent played Shenlong1, and things went sideways very very early in this game. I had assumed my opponent would gun for an alpha strike early on with the Wind Golem and try to smash Mad Dog to pieces. It seems to be the done thing. I set Mad Dog a little bit conservatively back in the hope that he would be close enough for me to heal. Unfortunately, my opponent turned out to have every Severe Ram in hand and flipped the Red Joker so Mad Dog took more damage than I'd originally anticipated from all the collision pips, I mostly flipped weaks on the four Soulstones I burned on damage prevention, and he finished the Wind Golem's activation on about 3 health which was a bit lower than I'd estimated.
Still, on the plus side, I had saved Benny for last and the rat summon segued into a good Swarm Them bonus action that dropped the Wind Golem to half health. All I had to do was win initiative for Turn 2, and my hand had three 13s in it so I was pretty confident I would be able to both do that and kill the Wind Golem.
Then my opponent cheated the Red Joker to win initiative and killed Mad Dog (thanks to another weak soulstone damage reduction flip) and the Wind Golem was able to Leap back to his deployment and away from my ability to kill it. Instead of baiting in a 10 point model, I'd lost my 10 point model for nothing. This basically sealed the game. I made a decent show of it, focussing all my attention on scoring and using the graveyard wall to my own advantage for a bit to keep away from Shenlong, but in the end I couldn't really kill his models (did kill the Wind Golem at one point though!) or prevent him from scoring. I lost this game 6-4, getting most of my scheme points successfully but never really able to be competitive on the strategy. I probably could have made it 5-4 had I properly taken stock of where my opponent's bomb tokens were though, I hadn't realised when I killed the Wind Golem that it had been carrying a lot of scoring potential and that if Parker had just run away with those bombs and never tried to plant them himself my opponent would have been capped at 3 strategy points. But it's hard to say, and it was rough just finding the actions to get my own schemes.
Game 5
The final game of the event was Raid the Vaults with another extremely scheme marker heavy scheme pool. I wasn't really sure what I wanted to play for this, but decided that since Parker's models were out of the case already I may as well run him. My opponent played Dreamer2, who I am at least very familiar with. Thankfully my opponent ran the Insidious Madness build, which I find far less threatening than the Stitched-producing, Teddy-and-Yume triple threat that is my regular Dreamer2 opponent's mainstay. Neither of us was really able to do much to the other for most of the game, Insidious Madnesses lack the hitting power to get through all of Parker's healing and Parker's stats and card game are too poor to compete with Dreamer's card draw, so I contended myself with sniping out the Daydreams reasonably early and flooding the board with so many schemes that it trivialised my scoring and took away all my opponent's scoring options. I think I won this game with a decisive 8-4.
Final Thoughts
This was my second time attending the New Zealand Nationals and it was every bit as fun the second time. It is an absolutely wild meta though, with so many strong players on or about the same level. We had such a ridiculous number of ties this year that there weren't any players able to claim a podium position with a clean 4-1 win-loss result, so I actually reached third place with my 3-2 result! And technically, because the TO (my round two opponent, who had placed second in the end), disqualified himself from the results at the end, I was bumped up to second. My second time placing second at this event, in fact. If anyone out there is hankering to explore Middle Earth and play some Malifaux with some of the fiercest competition in the world, I can't recommend the New Zealand Nationals enough. Keep an eye out for flights this time next year and check in with the Kiwis when they're closer to organising the next one, most of them can be found heavily involved with the Vassal MWS event and should be able to point you in the right direction.

Comments
Post a Comment